

Moab Photography Tips: How to Capture the Red Rock Landscape Like a Local
There are places where you have to search for something worth photographing.
Moab isn’t one of them.
Around here, the challenge isn’t finding something to photograph. It’s deciding where to point the camera.
Towering sandstone cliffs, natural arches, the Colorado River, distant La Sal Mountains, desert sunsets and miles of backcountry make Moab one of the most photogenic destinations in the American West.
And you don’t need thousands of dollars of camera equipment to capture it.
Some of our favorite photographs are taken with phones.
The secret to great Moab photography is less about the camera you’re carrying and more about where you go, when you go and how you use the incredible desert light.
Whether you’re carrying a professional camera or the phone in your pocket, here are a few tips for bringing home photographs that actually look like the Moab you remember.
The Most Important Photography Tip in Moab: Watch the Light
If there is one thing that can completely change your Moab photographs, it’s the time of day.
The middle of a sunny afternoon can create harsh light and flatten the texture of the sandstone. Early morning and late afternoon are different.
When the sun is low, shadows stretch across the landscape and reveal layers, cracks and formations that almost disappear beneath the midday sun.
The red sandstone also becomes warmer and richer.
This is why photographers often talk about the golden hour, the period shortly after sunrise and before sunset.
The National Park Service recommends early morning and late afternoon for photographing Arches National Park because the lower angle of the sun gives the landscape greater depth and intensifies the colors of the sandstone.
But don’t pack the camera away if clouds appear.
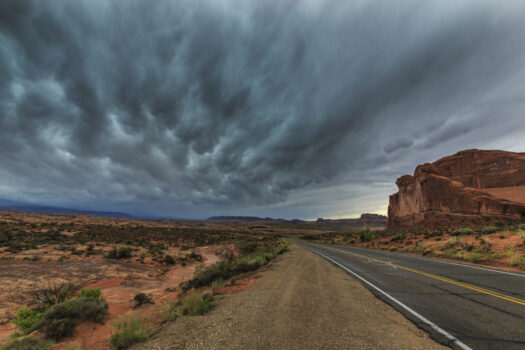
Clouds can be one of the best things that happen during a photography day in Moab.
Don’t Be Afraid of Moab Weather
Visitors sometimes see clouds building over the La Sal Mountains and assume their photography day is ruined.
Quite often, the opposite is true.
Passing storms create some of the most dramatic conditions you’ll ever see in southeastern Utah.
Dark clouds behind illuminated sandstone can completely transform a photograph. Sunlight breaking through clouds can spotlight individual mesas and cliffs. Rain can temporarily deepen the colors of the sandstone.
If conditions are safe, don’t automatically head back to the hotel because clouds have arrived.
You might be about to get the best photograph of your trip.
Of course, desert storms also need to be taken seriously. Flash flooding and lightning can create dangerous conditions, especially in washes, canyons and exposed areas.
Photography is never worth putting yourself in a dangerous position.
Your Phone Is Probably Better Than You Think
One of the biggest changes since we first wrote this article in 2015 is the camera almost everyone now carries.
Your smartphone.
Modern phones are remarkably good at landscape photography.
You can capture wide angle landscapes, portraits, panoramas, video and surprisingly good photographs in low light without carrying a traditional camera.
A few simple tricks make a big difference.
Clean your camera lens before taking pictures. Phones spend most of their lives in pockets, purses and cup holders, and a fingerprint on the lens can make an otherwise beautiful sunset look hazy.
Use the grid on your phone to help compose your photograph.
Try placing the horizon in the upper or lower third of the photograph rather than directly through the center.
Most importantly, move around.
Don’t just stand at the designated viewpoint, hold your phone at eye level and take one photograph.
Move a few feet.
Get lower.
Look for a tree, Jeep or person to add scale.
Turn around.
Sometimes the best photograph is behind you.
Use People and Jeeps to Show Scale
One of the hardest things to communicate in photographs of Moab is just how enormous everything is.
A sandstone cliff can be hundreds of feet tall, but without something recognizable in the photograph, it may look surprisingly small.
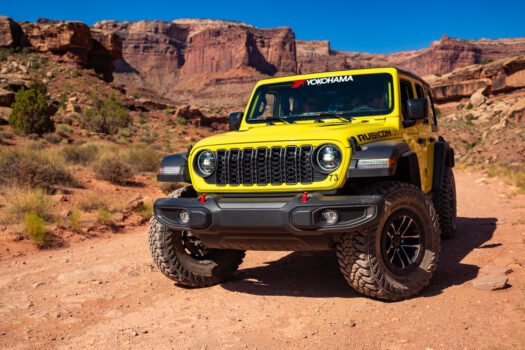
Put a person in the photograph.
Or a Jeep.
Suddenly the viewer understands the scale.
This works particularly well when you’re exploring Moab’s backcountry.
A Jeep Wrangler surrounded by sandstone cliffs tells a much bigger story than a photograph of the cliffs alone.
Instead of simply showing where you went, the photograph shows the adventure of getting there.
A Jeep Can Take Your Photography Beyond the Highway
Arches National Park and Canyonlands National Park contain some of the most famous photography locations in Utah, but some of our favorite Moab photography spots aren’t found next to paved parking lots.
That’s where having a capable four wheel drive vehicle changes the experience.
A Jeep Wrangler Rubicon from Canyonlands Jeep Adventures allows you to explore designated backcountry roads and reach landscapes most visitors never see.
Consider places such as:
Long Canyon
One of the classic Moab drives, with enormous canyon walls, views toward the Colorado River and the famous section where the road passes beneath a massive fallen rock.
Shafer Trail
Few roads photograph better than the Shafer switchbacks descending from Island in the Sky. From above, you can capture the road zigzagging through the cliffs. From below, the towering canyon walls completely change the perspective.
Gemini Bridges
The drive toward Gemini Bridges provides broad views across the Moab landscape with the La Sal Mountains creating an incredible backdrop.
Hurrah Pass and Chicken Corners
This area provides beautiful views of the Colorado River, Kane Creek Canyon and vast stretches of desert backcountry.
Fossil Point and Thelma & Louise Point
This is classic cinematic Moab. Huge cliffs, the Colorado River and an enormous landscape explain why Hollywood filmmakers have been coming to southeastern Utah for generations.
The advantage of exploring these places on your own is time.
If the light suddenly becomes perfect, you can stop.
If you find an interesting viewpoint, you can spend twenty minutes there.
If sunset is getting better by the minute, you don’t have to leave because a tour schedule says it’s time to move on.
Sometimes photography requires patience.
Best Photography Locations in Arches National Park
You could spend several days photographing Arches National Park alone.
For morning photography, the National Park Service recommends locations including The Three Gossips, Sheep Rock, Turret Arch, Double Arch, Wolfe Ranch and Landscape Arch.
Late afternoon light works particularly well around Park Avenue, Courthouse Towers, Balanced Rock, the Windows, Delicate Arch, Fiery Furnace, Skyline Arch and Tower Arch.
Don’t assume Delicate Arch is the only photograph worth getting.
Some of the most interesting photographs come from looking for compositions other visitors walk past.
And remember that you’re sharing these places with everyone else.
Hundreds of people can be around Delicate Arch at sunset during busy periods. Instead of getting frustrated because someone walked into your photograph, consider using people to show the scale of the arch and tell the story of the place.
Photographing Canyonlands National Park
Canyonlands offers a completely different style of photography.
Arches often gives you a recognizable subject.
Canyonlands gives you scale.
From Island in the Sky, you’re looking across layers of canyons, mesas, cliffs and desert stretching toward the horizon.
Early morning can be particularly beautiful because atmospheric haze is often lower, providing clearer views into the distance. Clouds can add even more depth as their shadows move across the landscape.
Some of our favorite areas include Grand View Point, Green River Overlook, Shafer Canyon and viewpoints overlooking the White Rim.
Give yourself time here.
Canyonlands is the kind of place where the photograph you take five minutes after arriving may look completely different from the one you take twenty minutes later.
Don’t Forget the La Sal Mountains
Everyone comes to Moab expecting red rocks.
Then they look east.
The La Sal Mountains rise more than 12,000 feet above sea level and create one of the most recognizable backgrounds in southeastern Utah.
In winter and spring, snow covered peaks rising behind red sandstone can create spectacular photographs.
Fall is another great time to explore the mountains. Autumn colors typically begin appearing around the middle of September and can continue into early October.
The contrast between golden aspens, dark evergreens, red sandstone and blue sky makes fall one of our favorite times to photograph Moab.
Stay After the Sun Goes Down
Don’t put your camera away at sunset.
Moab’s night sky is another reason photographers love this area.
Arches National Park offers outstanding opportunities for photographing stars and the Milky Way against sandstone formations.
For traditional cameras, start experimenting with manual settings, a wide aperture, higher ISO and exposures approaching 20 to 30 seconds. A tripod makes long exposures considerably easier.
Phones have also become surprisingly capable at night photography. Many newer models automatically detect low light and increase exposure time when held steady.
One important rule applies inside Arches National Park: using artificial light to illuminate landscapes, rock formations or other park features is prohibited.
Let the stars do the work.
Protect What You’re Photographing
This may be the most important photography tip in this entire article.
Don’t damage the landscape trying to get a photograph of it.
Moab’s desert looks tough.
It isn’t.
The dark, sometimes bumpy soil surrounding many trails is biological soil crust, a living community that plays an important role in the desert ecosystem. Footsteps and vehicle tires can damage crust that may take decades or even longer to recover.
Stay on established trails and durable surfaces.
Keep your Jeep on designated roads.
Don’t move rocks or vegetation to improve a photograph.
Don’t drive into the desert because you’ve found the perfect Instagram background.
And don’t stand somewhere unsafe simply because the photograph would look amazing.
The National Park Service specifically reminds photographers that biological soil crust can take an extremely long time to recover after being damaged.
The goal is pretty simple.
Get the photograph without changing the place.
Sometimes Put the Camera Away
This sounds strange in an article about photography, but it’s worth saying.
Not everything needs to become a photograph.
Drive somewhere quiet.
Turn off the Jeep.
Listen.
Watch the cliffs change colors as the sun gets lower.
Look across Canyonlands without immediately reaching for your phone.
Some of the best memories you’ll take home from Moab won’t be stored on a memory card.
Find Your Own Moab Photograph
You’ve probably already seen thousands of photographs of Delicate Arch.
You don’t need to take exactly the same one.
One of the best things about Moab is that the landscape changes constantly depending on weather, season, light and where you decide to explore.
Take the famous photographs.
But then go find your own.
Drive Long Canyon in the morning.
Photograph your Jeep beneath towering sandstone walls.
Watch a storm move across Canyonlands.
Catch the La Sal Mountains reflecting the last light of the day.
Or head down a designated dirt road simply because the view around the next corner looks interesting.
At Canyonlands Jeep Adventures, we think one of the best parts of renting a Jeep is having the freedom to explore Moab at your own pace.
Sometimes that means driving a famous trail.
Sometimes it means stopping along the way because the light hitting the red rocks is just too good to pass up.
Bring your camera.
Bring your phone.
Bring plenty of water.
And give yourself enough time to stop and look around.
Because in Moab, the best photograph of your trip might be somewhere you never planned to stop.
